Define continuous integration and continuous delivery, review the steps in a CI/CD pipeline, and explore DevOps and IaC tools used to build a CI/CD process.
Continuous integration (CI) and continuous delivery (CD) are crucial parts of developing and maintaining any cloud-native application. From my experience, proper adoption of tools and processes makes a CI/CD pipeline simple, secure, and extendable. Cloud native (or cloud based) simply means that an application utilizes cloud services. For example, a cloud-native app can be a web application deployed via Docker containers and uses Azure Container Registry deployed to Azure Kubernetes Services or uses Amazon EC2, AWS Lambda, or Amazon S3 services.
In this article, we will:
-
Define continuous integration and continuous delivery
-
Review the steps in a CI/CD pipeline
-
Explore DevOps and IaC tools used to build a CI/CD process
An Overview of CI/CD
The continuous integration process is when software engineers combine all parts of the code to validate before releasing tested applications to dev, test, or production stages. CI includes the following steps:
-
Source control - Pulls the latest source code of the application from source control.
-
Build - Compiles, builds, and validates the code or creates bundles and linting in terms of JavaScript/Python code.
-
Test - Runs unit tests and validates coding styles.
Following CI is the continuous delivery process, which includes the following steps:
-
Deploy - Places prepared code into the test (or stage) environment.
-
Testing - Runs integration and/or load tests. This step is optional as an application can be small and not have a huge load.
-
Release - Deploys an application to the development, test, and production stages.
In my opinion, CI and CD are two parts of one process. However, in the cloud-native world, you can implement CD without CI. You can see the whole CI/CD process in the diagram below:

Figure 1
The Importance of CI/CD in Cloud-Native Application Development
Building a successful cloud-native CI/CD process relies on the Infrastructure-as-Code (IaC) toolset. Many cloud-native applications have integrated CI/CD processes that include steps to build and deploy the app and provision and manage its cloud resources.
How IAC Supports CI/CD
Infrastructure as Code is an approach where you can describe and manage the configuration of your application’s infrastructure. Many DevOps platforms support the IaC approach, integrating it directly into the venue for example, Azure DevOps, GitHub, GitLab, and Bitbucket support YAML pipelines. With the YAML pipeline, you can build CI/CD processes for your application with infrastructure deployment. Below, you can see DevOps platforms that can easily be integrated with IaC tools:
-
Azure Resource Manager, Bicep, and Farmer
-
Terraform
-
Tekton
-
Pulumi
-
AWS CloudFormation
Building a Successful Cloud-Native CI/CD Process
In many cases, the CI/CD process for cloud-native applications includes documenting and deploying infrastructure using an IaC approach. The IaC approach allows you to:
-
Prepare infrastructure for your application before it is deployed.
-
Add new cloud resources and configuration.
-
Manage existing configurations and solve problems like “environment drift”.
Environment drift problems appear when teams have to support multiple environments manually. Drift can lead to an inconsistent environment setting that causes application outages. A successful CI/CD process with IaC relies on what tool and platform you use.
Let’s have a look into the combination of the most popular DevOps and IaC tools.
Azure DevOps
Azure DevOps is a widely used tool to organize and build your cloud-native CI/CD process, especially for Azure Cloud. It supports UI and YAML-based approaches to building pipelines. I prefer using this tool when building an automated CI/CD process for Azure Cloud. Let’s look at a simple YAML pipeline that creates a virtual machine (VM) in Azure DevTest Labs:
    . . . . . .
    jobs:
    - deployment: deploy
      displayName: Deploy
      pool:
        vmImage: 'ubuntu-latest'
      environment: $

      strategy:
        runOnce:
          deploy:
            steps:
            - checkout: self
            - task: AzurePowerShell@4
              displayName: 'Check vm-name variable exists'
              continueOnError: true
              inputs:
                azureSubscription: $
                scriptType: "inlineScript"
                azurePowerShellVersion: LatestVersion
                inline: |
                  $vm_name="$(vm-name)"
                  echo $(vm-name) - $vm_name
                  #if ([string]::IsNullOrWhitespace($vm_name))
                  {
                      throw "vm-name is not set"
                  }

            - task: AzureResourceManagerTemplateDeployment@3
              displayName: 'New deploy VM to DevTestLab'
              inputs:
                deploymentScope: 'Resource Group'
                azureResourceManagerConnection: $
                subscriptionId: $
                deploymentMode: 'Incremental'
                resourceGroupName: $
                location: '$(location)'
                templateLocation: 'Linked artifact'
                csmFile: templates/vm.json
                csmParametersFile: templates/vm.parameters.json
                overrideParameters: '-labName "$"
                                     -vmName $ -password $
                                     -userName $
                                     -storageType
    . . . . . .
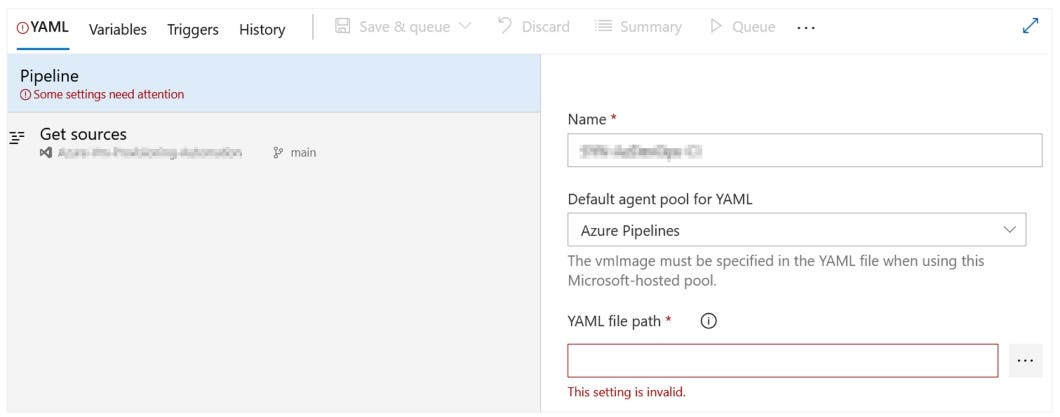
To simplify the pipeline listing, I’ve shortened the example above. As you can see, the pipeline code can also be generic; therefore, you can reuse it in multiple projects. The pipeline’s first two steps are in-line PowerShell scripts that validate and print required variables. Then this pipeline can be integrated easily into Azure DevOps, as shown in the image below:

Figure 2
The last step creates the VM in Azure DevTest Labs using Azure Resource Manager (ARM) templates and is represented via the JSON format. This step is quite simple: It sends (overrides) variables into the ARM scripts, which Azure uses to create a VM in the DevTest Labs.
AWS CloudFormation
AWS CloudFormation is an IaC tool from the AWS Cloud stack and is intended to provision resources like EC2, DNS, S3 buckets, and many others. CloudFormation templates are represented in JSON and YAML formats; therefore, they can be an excellent choice to build reliable, cloud-native CI/CD processes. Also, many tools like Azure DevOps, GitHub, Bitbucket, and AWS CodePipelines have integration options for CloudFormation.
Below is an example of what an AWS CloudFormation template may look like, which I’ve shortened to fit in this article:
    {
      "AWSTemplateFormatVersion" : "2010-09-09",
      "Parameters" : {
         "AccessControl" : {
         "Description" : " The IP address range that can be used to access the CloudFormer tool. NOTE:
    We highly recommend that you specify a customized address range to lock down the tool.",
          "Type": "String",
          "MinLength": "9",
          }
      },
          "Mappings" : {
            "RegionMap" : {
            "us-east-1" : { "AMI" : "ami-21341f48" },
            }
      }
      "Resources" : {
         "CFNRole": {
         "Type": "AWS::IAM::Role",
         "Properties": {
         "AssumeRolePolicyDocument": {
                "Statement": [{
                "Effect": "Allow",
                "Principal": { "Service": [ "ec2.amazonaws.com" ] },
                "Action": [ "sts:AssumeRole" ]
                }]
          },
          "Path": "/"
          }
          },
      }
    }
CloudFormation templates contain sections including:
-
Parameters - You can specify input parameters to run templates from the CLI or pass data from AWS CodePipeline (or any other CI/CD tool).
-
Mappings - You can match the key to a specific value (or set of values) based on a region.
-
Resources - You can declare the resources included, answering the “what will be provisioned” question, and you can adjust the resource according to your requirement using a parameter.
AWS CloudFormation templates look similar to Azure ARM templates as they do the same work but for different cloud providers.
Google Cloud Deployment Manager
Google Cloud (GC) offers Cloud Deployment Manager, the all-in-one tool that includes templates that describe resources for provisioning and templates to build CI/CD pipelines. The templates support:
-
YAML
Let’s explore a deployment of the VM using Jinja templates ‘ it looks common to YAML:
    resources:
    - type: compute.v1.instance
      name: -deployment-vm
      properties:
         zone:
         machineType:https://www.googleapis.com/compute/v1/projects//zones/
    /machineTypes/f1-micro
         disks:
         - deviceName: boot
         type: PERSISTENT
         boot: true
         autoDelete: true
         initializeParams:
         sourceImage: https://www.googleapis.com/compute/v1/projects/debian-cloud/global/images/family/
    debian-9
         networkInterfaces:
         - network: https://www.googleapis.com/compute/v1/projects//global/networks/
    default
         accessConfigs:
         - name: External NAT
         type: ONE_TO_ONE_NAT
The example above is similar to ARM and CloudFormation templates as it describes resources to deploy. In my opinion, the YAML/Jinja 2.10.x format works better than the JSON-based structure because:
-
YAML increases readily and can read much faster than JSON
-
Teams can find and fix errors in YAML and Jinja faster than in JSON
-
YAML pipelines (with small adaptations) can be reused on many other platforms
You can find an extended version of this example in the GitHub gist.
Tekton and Kubernetes
Tekton, supported by the CD Foundation (part of the Linux Foundation), is positioned as an open-source CI/CD framework for cloud-native applications based on Kubernetes. The Tekton framework’s components include:
-
Tekton Pipelines - Most essential and are intended to build CI/CD pipelines based on Kubernetes Custom Resources.
-
Tekton Triggers - Provide logic to run pipelines based on an event-driven approach.
-
Tekton CLI - Built on top of the Kubernetes CLI and allows you to run pipelines, check statuses, and manage other options.
-
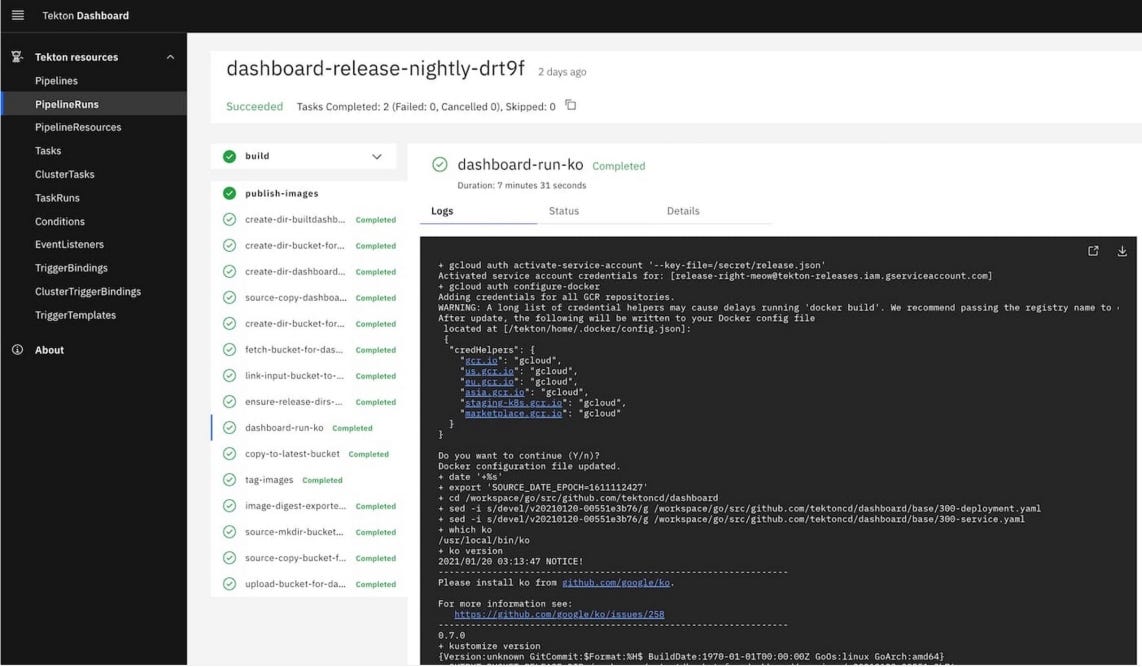
Tekton Dashboard and Hub Use web-based graphical interfaces to run pipelines and observe pipeline execution logs, resource details, and resources for the entire cluster (see dashboard in Figure 3).

Figure 3
I like the idea behind Tekton Hub that you can share your pipelines and other reusable components. Let’s look at a Tekton Pipeline example:
    apiVersion: tekton.dev/v1beta1
    kind: Pipeline
    metadata:
      name: say-things
    spec:
      tasks:
        - name: first-task
          params:
            - name: pause-duration
              value: "2"
            - name: say-what
              value: "Hello, this is the first task"
          taskRef:
            name: say-something
        - name: second-task
          params:
            - name: say-what
              value: "And this is the second task"
          taskRef:
            name: say-something
The pipeline code above is written in the native Kubernetes format/manifests and represents a set of tasks. Therefore, you can build native cross-cloud CI/CD processes. In the tasks, you can add steps to operate with Kubernetes resources, build images, print information, and many other actions. You can find the complete tutorial for Tekton Pipelines here.
Terraform, Azure Bicep, and Farmer
Terraform is a leading platform for building reliable CI/CD processes based on the IaC approach. I will not go in depth on Terraform as it requires a separate article (or even book). Terraform uses a specific language that simplifies building CI/CD templates. Also, it allows you to reuse code parts, adding dynamic flavor to the CI/CD process. Therefore, you can build templates that are much better than ARM/JSON templates. Let’s see a basic example of Terraform template code:
    terraform {
      required_providers {
      }
      backend "remote" {
        organization = "YOUR_ORGANIZATION_NAME"
        workspaces {
          name = "YOUR_WORKSPACE_NAME"
        }
      }
    }
The basic template above contains the resources, providers, and workspace definition. The same approach follows the Azure Bicep and Farmer tools. These Terraform analogs can drastically improve and shorten your code. Let’s look at the Bicep example below:
    param location string = resourceGroup().location
    param storageAccountName string = 'toylaunch${uniqueString(resourceGroup().id)}'

    resource storageAccount 'Microsoft.Storage/storageAccounts@2021-06-01' = {
      name: storageAccountName
      location: location
      sku: {
        name: 'Standard_LRS'
      }
      kind: 'StorageV2'
      properties: {
        accessTier: 'Hot'
      }
    }
The Bicep code above deploys storage accounts in the US region. You can see that the JSON ARM example acts the same. In my opinion, Terraform and Azure Bicep are shorter and much easier to understand than ARM templates. The Farmer tool can also show impressive results in readability and type-safe code:
    // Create a storage account with a container
    let myStorageAccount = storageAccount {
        name "myTestStorage"
        add_public_container "myContainer"
    }

    // Create a web app with application insights that's connected to the storage account.
    let myWebApp = webApp {
        name "myTestWebApp"
        setting "storageKey" myStorageAccount.Key
    }

    // Create an ARM template
    let deployment = arm {
        location Location.NorthEurope
        add_resources [
            myStorageAccount
            myWebApp
        ]
    }

    // Deploy it to Azure!
    deployment
    |> Writer.quickDeploy "myResourceGroup" Deploy.NoParameters
Above, you can see how to deploy your web application to Azure in 20 lines of easily readable and extensible code.
Pulumi
The Pulumi framework follows a different approach to building and organizing your CI/CD processes: It allows you to deploy your app and infrastructure using your favorite programming language. Pulumi supports Python, C#, TypeScript, Go, and many others. Let’s look at the example below:
    public MyStack()
    {
        var app = new WebApplication("hello", new()
        {
            DockerImage = "strm/helloworld-http"
        });

        this.Endpoint = app.Endpoint;
    }
This part of the code deploys the web app to the Azure cloud and uses Docker containers to spin up the web app. You can find examples of how to spin up the web app in an AKS cluster as well as from the Docker container here
Conclusion
Building a cloud-native CI/CD pipeline for your application can be a never-ending story if you don’t know the principles, tools, and frameworks best suited for doing so. It is easy to get lost in various tools, providers, and buzzwords, so this article aimed to explain what CI/CD cloud-native applications are and walk you through the widely used tools and principles of building reliable CI/CD pipelines. Having this guide helps you to feel comfortable while designing CI/CD processes and choosing the right tools for your cloud-native application.
This is an article from DZone’s 2022 DevOps Trend Report. For more: Read the Report


![Docker Security [Refcard]](https://cdn-images-1.medium.com/max/11524/1*OCIsxCqgU9Sxd3uxIm8kMA.jpeg)

Comments